Tag Archives: Head of the Harbor NY

Dust-Free Hardwood Floor Refinishing in Head of the Harbor

In Head of the Harbor, hardwood floors in larger colonials and waterfront-adjacent homes often look fine at first glance, until sunlight from the windows reveals every scratch, dull patch, and worn traffic lane. It is a common problem in homes near Stony Brook Harbor, as well as nearby areas like Stony Brook, Setauket, Old Field, Nissequogue, and the Three Village area, especially where prefinished engineered planks were installed years ago and are now too worn to ignore. Many homeowners assume they have only two choices: live with the damage or replace the floor completely. They also picture sanding as a dusty mess that settles into vents, trim, and furniture for days.

The good news is that modern Head of the Harbor hardwood floor refinishing is far cleaner, faster, and more precise than most people expect. With proper containment, HEPA-equipped sanding systems, and instant-cure finish technology, it is often possible to restore worn engineered floors without turning the house upside down. That matters to homeowners in Head of the Harbor, Stony Brook, Setauket, and surrounding Long Island communities who want a clean process and a reliable result. The real question usually is not whether the floor looks bad enough to fix. It is whether that specific engineered floor can be refinished safely, and which approach makes the most sense.

Homeowners searching for local answers often start with a broader Long Island service area overview and then narrow down what applies to their own floor type. The details matter. Veneer thickness matters. Old wax residue matters. The difference between "dust-free" and "zero dust" matters. So does finish choice if you need your rooms back quickly.

Introduction Restoring Floors in Head of the Harbor

In Head of the Harbor, floors take a different kind of wear than they do in a quick-turn rental or a small apartment. You see it in larger colonials, waterfront-adjacent homes, and renovated interiors where engineered hardwood was chosen for stability but now shows dull finish, pet scratches, and fading in the main living spaces. The same pattern shows up in nearby Stony Brook, Setauket, Old Field, and Nissequogue, where homeowners want to preserve quality wood flooring without unnecessary replacement. The frustration is usually the same. The floor is real wood on top, but nobody seems to give a straight answer about whether it can be refinished.

That uncertainty leads many homeowners to wait too long. They keep layering rugs over problem spots or using store-bought polishes that make the floor shinier for a week and harder to repair later. For Head of the Harbor hardwood floor refinishing, the right first step is always diagnosis, not guesswork.

Practical rule: If the floor still has a healthy wear layer and the damage is mostly in the finish, refinishing is often the cleaner and smarter move than tearing out the whole floor.

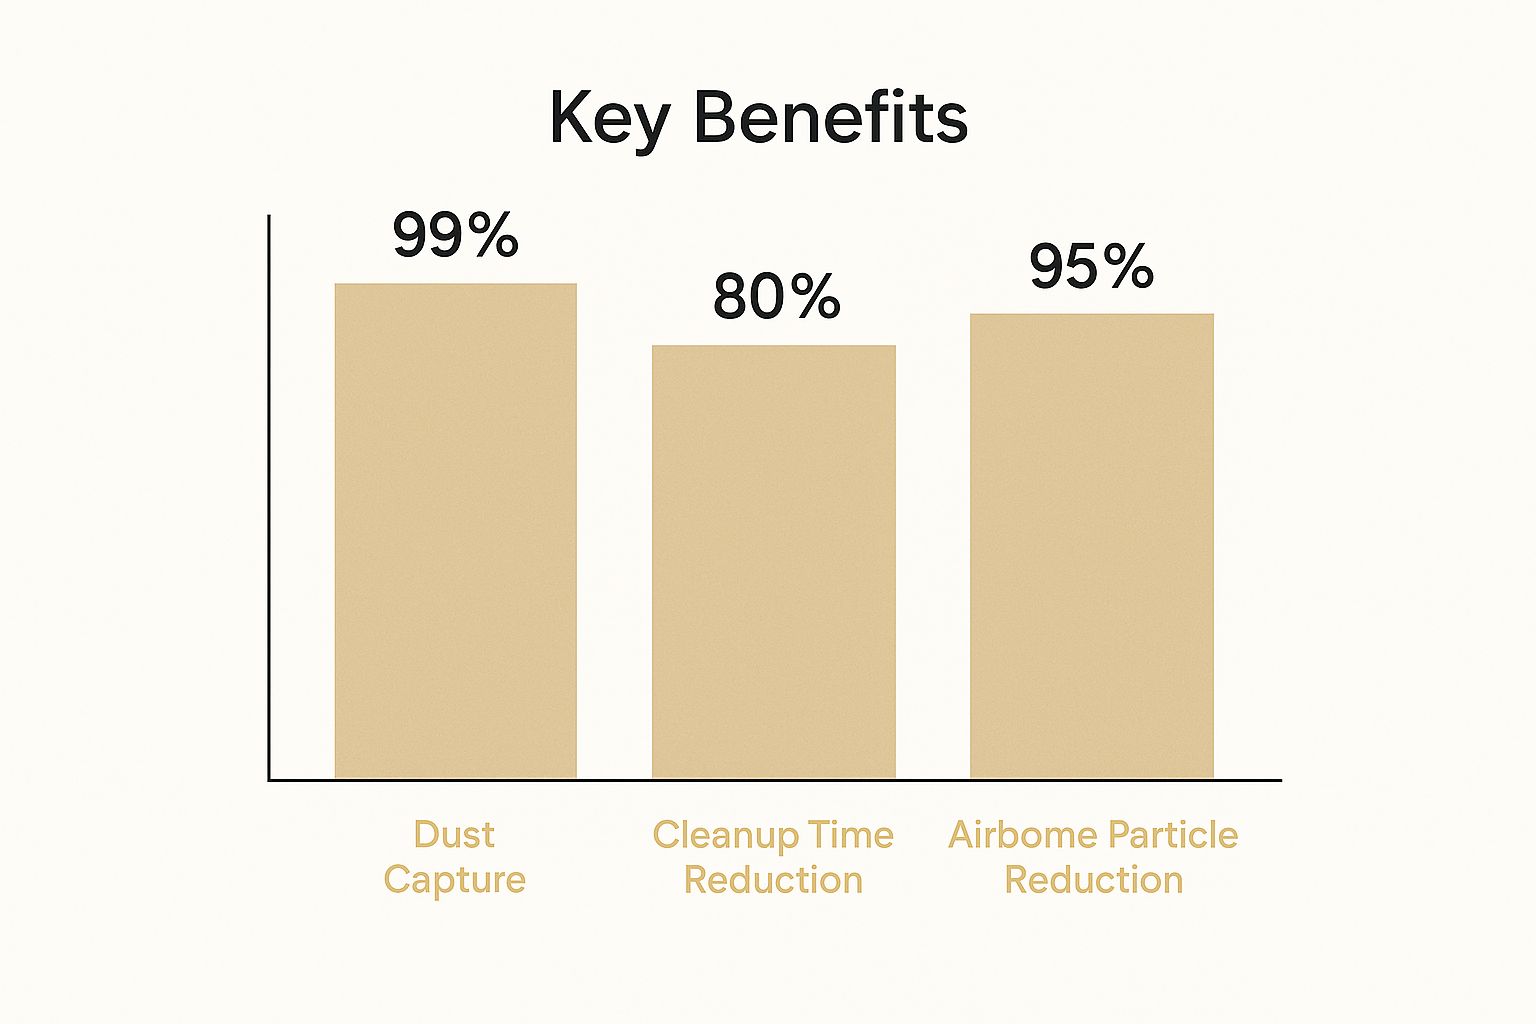
Modern dust containment also changes the conversation. Dust-free systems don't mean magic. They mean a controlled process that captures the vast majority of sanding dust before it spreads through the home. That's a major difference for households in Head of the Harbor and nearby North Shore communities with pets, kids, or anyone sensitive to indoor air quality.

Understanding Your Engineered Hardwood Floors

Engineered hardwood can be conceptualized as a layer cake. The top layer is real hardwood. Under that sits a stable core made from stacked material designed to reduce movement. That construction is why engineered flooring performs well in Long Island homes where humidity can shift with the seasons, especially in areas close to the water.

A diagram explaining the composition of engineered hardwood flooring, showing the veneer layer and stable core structure.

The veneer is the part that matters most

The veneer layer is the wood surface you see and walk on every day. That layer controls color, grain, and refinishing potential. Some engineered floors have enough wood on top to allow sanding. Some don't. That's why one engineered floor can be restored beautifully while another is better suited to a lighter maintenance approach.

If you want a plain-language comparison of wood surface construction, Gates Home Furnishings explains solid wood vs veneer in a way many homeowners find useful before they evaluate their own floor.

The stable core is why engineered floors work well locally

The lower layers give the floor its dimensional stability. That matters in Head of the Harbor homes where interior climate control, seasonal moisture, and wider plank formats can all influence movement. The same is true in nearby waterfront and North Shore communities like Stony Brook and Nissequogue. The floor may look like a solid plank from above, but it behaves differently because of that layered build.

Homeowners trying to understand subfloor and assembly issues can also review this overview of engineered wood and subfloor conditions. It helps explain why installation type and board construction affect refinishing choices.

A few common engineered floor variations show up again and again in local homes:

  • Prefinished smooth planks: These often have aluminum oxide factory finishes that require the right abrasives and approach.
  • Wire-brushed or hand-textured boards: These can be refinishable, but the texture may soften during sanding.
  • Wider modern planks: Attractive and stable, but not every product has enough top layer for aggressive sanding.
  • Older engineered oak floors: These are often good candidates for corrective work if the veneer is substantial.

For floors that are appropriate for a full restoration, Full Sanding & Refinishing means removing the old finish and surface imperfections through precision sanding, then applying new stain and finish for a like-new appearance.

The Deciding Factor Can Your Engineered Floors Be Refinished

The biggest myth in this trade is that engineered wood can't be refinished. Some engineered floors can't. Some absolutely can. The difference is usually the wear layer thickness, along with the condition of the boards and the type of damage present.

A hand rests on a cross-section sample of layered hardwood flooring showing refinishing and construction details.

What to check before assuming replacement is necessary

A homeowner can do a rough first pass, but final judgment should come from someone who works on engineered floors regularly. These are the clues that matter most:

  • Visible wear through the finish: If the problem is mainly dullness and surface scratching, the floor may still have good restoration potential.
  • Deep damage into the wood: Gouges, black stains, or swollen edges can change the recommendation.
  • Board edge thickness at vents or transitions: Sometimes you can see enough of the profile to understand whether a sandable layer exists.
  • Previous refinishing history: If the floor has already been sanded before, caution is necessary.

For a closer look at eligibility issues, this resource on refinishing engineered hardwood flooring is worth reviewing.

Refinishing vs replacing

Replacement makes sense when the veneer is too thin, the boards are failing, or moisture damage has compromised the floor system. But when the floor is structurally sound and the wear layer allows correction, refinishing is often the more sensible path. You keep the existing floor, avoid demolition, and preserve the character of the wood already in the home.

If you're hearing ā€œengineered floors can't be sandedā€ without anyone examining the floor profile, that's not a real assessment. It's a shortcut.

A recent local-style example is the kind of oak engineered floor often found in a Head of the Harbor colonial renovation, or in nearby Stony Brook and Setauket homes with similar layouts and sun exposure. The finish may be scratched and yellowed, but the boards themselves are still stable. In that case, the decision often comes down to whether the top layer can support full sanding or whether a less aggressive renewal is the safer move.

Our Advanced Dust-Free Hardwood Floor Refinishing Process

A common Head of the Harbor call goes like this: the floor looks worn, the house is furnished, and the homeowner wants the job done without coating every shelf, vent, and stair rail in sanding residue. That concern is valid. On engineered wood floors, the process has to protect both the home and the floor itself.

A five-step infographic illustrating Savera's professional, efficient, and clean dust-free hardwood floor refinishing process for homes.

What dust-free really means on the job

ā€œDust-freeā€ is industry shorthand, not a literal promise of zero airborne particles. Instead, it refers to controlled capture at the source. Professional sanding systems connect the machine to high-filtration vacuum equipment, so most dust is pulled in before it spreads through the room. That is a major improvement over older open-bag sanding setups, but containment still matters.

In practical terms, a clean refinishing job includes sealed work areas, protected returns and registers, careful airflow control, and HEPA vacuuming after each stage. Homes with open plans, second-floor overlooks, detailed millwork, or HVAC returns near the work zone need even tighter control. That is often especially relevant in larger homes across Head of the Harbor, Stony Brook, Setauket, and nearby Long Island neighborhoods. Homeowners who want general household strategies for reducing settled dust can also review J.G. Carpet Cleaning's dust guide.

We also use specialized equipment designed for dust-free sanding machines because collection quality depends on the full setup, not just the sander itself.

How the process changes for engineered hardwood

Engineered floors are less forgiving than thick solid plank. The sanding plan has to match the wear layer, the board condition, and the amount of correction the floor can safely take. A floor with light finish wear may only need a mild abrasion and recoat. A floor with deeper scratches or uneven sheen may justify a more involved sanding sequence, but only if the top layer allows it.

That is why the first part of the job is inspection, not sanding.

A typical process looks like this:

  1. Prepare and isolate the space. Furniture is removed as needed, openings are contained, and nearby surfaces are protected.
  2. Clean the floor thoroughly. Residue, oils, cleaning product buildup, and any contaminant that could interfere with adhesion have to come off first.
  3. Choose the least aggressive correction that will solve the problem. On engineered wood, that decision protects the wear layer.
  4. Sand or abrade with dust collection running at the machine. Edges, corners, and field areas are handled as one controlled system.
  5. Inspect before finish goes down. During this step, scratch pattern, color consistency, edge work, and repair quality are checked under proper light.
  6. Complete final cleanup before coating. Fine dust left behind can affect both appearance and bond.

Here's a look at the kind of process homeowners often want to see before booking a project:

Why this matters in a lived-in home

The biggest misconception is that dust control is only about cleanup. It also affects finish quality. If airborne dust settles back into wet coating, the floor can feel gritty or look less uniform than it should. Good containment helps protect indoor air, but it also helps produce a cleaner final surface.

For some engineered floors, full sanding is not the right move. Screen and Recoat can be the better option when the existing finish is worn but the surface damage has not gone through the coating into the wood. It refreshes protection with less material removal, which is often the smarter trade-off on modern engineered products.

Modern Finishes UV Cure vs Traditional Options

Once the floor is properly prepped, the finish choice controls two things homeowners care about right away. How soon the room can go back into service, and how the surface will hold up under real use.

A timeline graphic showing the evolution of hardwood floor finishes from oil-based to water-based to UV-curable technology.

What changes in daily use

On engineered wood, UV-cured finishes solve a practical scheduling problem. The coating hardens during the curing step, so homeowners are not waiting days for the floor to reach usable hardness. That can make a major difference in Head of the Harbor homes, as well as in Stony Brook, Setauket, and nearby North Shore communities where families are trying to stay in place during the project, or where a sale, rental turnover, or move-in date leaves very little room for delay.

Traditional water-based finishes still have their place. They are proven, widely used, and often a good fit when the household can allow a longer recovery window. The trade-off is downtime. Even after the floor looks dry, it still needs time before rugs, furniture, and heavy use are a good idea.

That distinction matters even more on engineered flooring because the refinishing opportunity may be limited. If a floor only has enough wear layer for one full sanding, the finish system should match the homeowner's priorities the first time.

Side-by-side practical comparison

Finish type Best fit Main trade-off
Traditional water-based finish Homeowners who can give the floor more time before full use Reliable option, but the cure window is longer
UV-curable finish Families, real estate listings, and busy households that need fast return to service Requires specialized equipment, careful prep, and a floor that is a good candidate for the system

Durability questions usually come next. The answer depends less on brand names alone and more on how the room is used, what condition the existing floor is in, and whether the prep was done correctly. A quiet guest room and a kitchen-adjacent family space put very different demands on the coating.

For engineered floors, bond matters as much as hardness. If the surface has contamination from waxes, polishes, or silicone-based cleaners, even a premium finish can fail. UV cure is not a shortcut around prep. It is a different curing method, and it performs best when the floor has been cleaned, abraded, and evaluated correctly. Homeowners who want more background on the coating itself can read this overview of UV finish technology for wood floors.

I usually explain it this way to clients. Traditional finishes dry and continue curing over time. UV finishes stay workable until the curing pass, then harden immediately under the light. That control is useful on engineered wood, where minimizing disruption without giving up finish quality is often the goal.

The right choice comes down to use, schedule, and floor construction. Pricing and finish options should be reviewed during an on-site consultation, after the floor has been checked for wear layer thickness, contamination, prior coatings, and the level of sanding the material can safely handle.

Frequently Asked Questions About Floor Refinishing

How do you maintain newly refinished engineered hardwood floors?

Day-to-day care matters more than specialty products. Keep abrasive grit off the floor with entry mats, regular sweeping or vacuuming on a hard-floor setting, and quick cleanup of spills before moisture sits on the surface.

Use only cleaners that match the finish system on the floor. Wax, oil soaps, polish restorers, and silicone-based products create residue that can change the sheen and cause bonding problems later if the floor ever needs a recoat. On engineered wood, that matters because future correction options are often more limited than they are on solid hardwood.

If the floor starts to look tired, the cause is not always wear. In many homes, it is cleaner buildup.

Is dust-free hardwood floor refinishing safe for children and pets?

It is safer and cleaner than open sanding, but homeowners should understand what the term means. A 99% dust-free system captures the vast majority of sanding dust at the source and keeps the job far cleaner than older methods. It does not mean a house becomes a sterile environment with zero airborne particles at every moment of the project.

Good containment, proper equipment, and careful cleanup make the difference. In homes with children, pets, asthma concerns, or general sensitivity to dust, I still recommend following job-site guidance, limiting access to work areas, and treating the project like any other controlled construction process.

Finish choice also affects indoor comfort. Low-odor, low-VOC systems are usually a better fit for occupied homes.

Can pets walk on UV-cured hardwood floors right away?

In many cases, yes. That is one of the practical advantages of UV-cured finish systems. Once the coating is properly cured under the UV light, the floor is ready for use much sooner than a traditional finish that still needs time to dry and harden.

The catch is prep. If the floor has contamination from wax, polish, or silicone residue, instant cure will not fix that. The finish still has to bond to a properly prepared surface, especially on engineered floors where the goal is to protect the wear layer while getting a durable result.

I also tell pet owners to use common sense the first day. Clean paws, trimmed nails, and delayed rug placement help protect a fresh finish.

What is the difference between a screen and recoat and a full hardwood floor refinish?

A screen and recoat renews the top finish layer when the wood itself is still in good shape and the problems are limited to light surface wear, minor dullness, or small scratches. It does not remove deeper damage, change the floor color, or correct boards with finish failure.

A full refinish goes further. It removes the old finish and addresses heavier wear, deeper scratching, uneven color, and other issues that a recoat cannot solve. With engineered wood, the decision depends on the thickness of the actual wood wear layer and the current condition of the floor. Some engineered floors can be sanded and refinished successfully. Some should only be recoated. Some are too thin or too worn for either option.

That evaluation should happen on site, not by guesswork.

How long does hardwood floor refinishing usually take?

The schedule depends on the floor construction, the square footage, the condition of the existing finish, whether repairs or stain work are needed, and which coating system is being used. A straightforward recoat moves differently than a full sand and refinish, and engineered floors often require a more cautious approach than solid hardwood.

The best way to get an accurate timeline and price is to have the floor evaluated in person. That allows the contractor to check the wear layer, identify contamination or prior coatings, and recommend the safest process for that specific floor.

Your Local Experts for Dust-Free Hardwood Floor Refinishing in Head of the Harbor

Homeowners on Long Island trust Savera Wood Floor Refinishing to restore the natural beauty of their hardwood floors. Our dust-free sanding system and advanced UV-curable finishes provide a modern alternative to traditional refinishing methods. With UV technology that cures instantly, you can move your furniture back the same day, no lingering odors, no downtime.

Whether you're looking for a Scandinavian whitewash, a natural raw wood look, a soft warm amber tone, or a custom stain to complement your home, we have the perfect refinishing solution for your style and home traffic.

All our services include dust-free containment and low-VOC, water-based finishes for a healthier, cleaner home environment. For homeowners in Head of the Harbor, Stony Brook, Setauket, Old Field, Nissequogue, and surrounding Long Island communities seeking fast results, our UV-cured finish gets your floors ready the same day, so
you can enjoy your beautifully restored hardwood floors immediately.

Transform your hardwood floors with Savera Wood Floor Refinishing, clean, modern, and stunning every time! 🌟

šŸ“ž Phone: 631-866-1972
🌐 Website: saverawoodfloorrefinishing.com
šŸ“ Service Area: Head of the Harbor, Setauket, Stony Brook, and surrounding Long Island communities.


If you're planning Dust-Free Hardwood Floor Refinishing in Head of the Harbor with Savera Wood Floor Refinishing, call 631-866-1972 or visit the website to schedule an evaluation for engineered floors, dust-free sanding, UV-cure finishes, screen and recoat service, deep cleaning, or wax removal.

Dust-Free Hardwood Floor Refinishing in Head of the Harbor

Engineered floors often look fine from across the room, then show every scratch, cloudy patch, and worn traffic lane once the afternoon sun hits them. In Head of the Harbor, that’s a common problem in larger homes near Stony Brook Harbor, especially where prefinished engineered planks were installed years ago and now feel too worn to ignore. Many homeowners assume the only options are living with the damage or replacing the floor entirely. They also worry that sanding means dust in vents, on trim, and across furniture for days.

That’s not how modern Head of the Harbor hardwood floor refinishing has to work. Clean containment, HEPA-equipped sanding systems, and instant-cure finish technology have changed what’s practical, especially for families who are still living in the home during the project. The bigger question is usually not whether the floor is ugly enough to fix. It’s whether the specific engineered floor can be refinished safely and which method makes sense.

Homeowners searching for local answers often start with a broader Long Island service area overview and then narrow down what applies to their own floor type. The details matter. Veneer thickness matters. Old wax residue matters. The difference between ā€œdust-freeā€ and ā€œzero dustā€ matters. So does finish choice if you need your rooms back quickly.

Introduction Restoring Floors in Head of the Harbor

In Head of the Harbor, floors take a different kind of wear than they do in a quick-turn rental or a small apartment. You see it in larger colonials, waterfront-adjacent homes, and renovated interiors where engineered hardwood was chosen for stability but now shows dull finish, pet scratches, and fading in the main living spaces. The frustration is usually the same. The floor is real wood on top, but nobody seems to give a straight answer about whether it can be refinished.

That uncertainty leads many homeowners to wait too long. They keep layering rugs over problem spots or using store-bought polishes that make the floor shinier for a week and harder to repair later. For Head of the Harbor hardwood floor refinishing, the right first step is always diagnosis, not guesswork.

Practical rule: If the floor still has a healthy wear layer and the damage is mostly in the finish, refinishing is often the cleaner and smarter move than tearing out the whole floor.

Modern dust containment also changes the conversation. Dust-free systems don’t mean magic. They mean a controlled process that captures the vast majority of sanding dust before it spreads through the home. That’s a major difference for households with pets, kids, or anyone sensitive to indoor air quality.

Understanding Your Engineered Hardwood Floors

Engineered hardwood can be conceptualized as a layer cake. The top layer is real hardwood. Under that sits a stable core made from stacked material designed to reduce movement. That construction is why engineered flooring performs well in Long Island homes where humidity can shift with the seasons, especially in areas close to the water.

A diagram explaining the composition of engineered hardwood flooring, showing the veneer layer and stable core structure.

The veneer is the part that matters most

The veneer layer is the wood surface you see and walk on every day. That layer controls color, grain, and refinishing potential. Some engineered floors have enough wood on top to allow sanding. Some don’t. That’s why one engineered floor can be restored beautifully while another is better suited to a lighter maintenance approach.

If you want a plain-language comparison of wood surface construction, Gates Home Furnishings explains solid wood vs veneer in a way many homeowners find useful before they evaluate their own floor.

The stable core is why engineered floors work well locally

The lower layers give the floor its dimensional stability. That matters in Head of the Harbor homes where interior climate control, seasonal moisture, and wider plank formats can all influence movement. The floor may look like a solid plank from above, but it behaves differently because of that layered build.

Homeowners trying to understand subfloor and assembly issues can also review this overview of engineered wood and subfloor conditions. It helps explain why installation type and board construction affect refinishing choices.

A few common engineered floor variations show up again and again in local homes:

  • Prefinished smooth planks: These often have aluminum oxide factory finishes that require the right abrasives and approach.
  • Wire-brushed or hand-textured boards: These can be refinishable, but the texture may soften during sanding.
  • Wider modern planks: Attractive and stable, but not every product has enough top layer for aggressive sanding.
  • Older engineered oak floors: These are often good candidates for corrective work if the veneer is substantial.

For floors that are appropriate for a full restoration, Full Sanding & Refinishing means removing the old finish and surface imperfections through precision sanding, then applying new stain and finish for a like-new appearance.

The Deciding Factor Can Your Engineered Floors Be Refinished

The biggest myth in this trade is that engineered wood can’t be refinished. Some engineered floors can’t. Some absolutely can. The difference is usually the wear layer thickness, along with the condition of the boards and the type of damage present.

A hand rests on a cross-section sample of layered hardwood flooring showing refinishing and construction details.

What to check before assuming replacement is necessary

A homeowner can do a rough first pass, but final judgment should come from someone who works on engineered floors regularly. These are the clues that matter most:

  • Visible wear through the finish: If the problem is mainly dullness and surface scratching, the floor may still have good restoration potential.
  • Deep damage into the wood: Gouges, black stains, or swollen edges can change the recommendation.
  • Board edge thickness at vents or transitions: Sometimes you can see enough of the profile to understand whether a sandable layer exists.
  • Previous refinishing history: If the floor has already been sanded before, caution is necessary.

For a closer look at eligibility issues, this resource on refinishing engineered hardwood flooring is worth reviewing.

Refinishing vs replacing

Replacement makes sense when the veneer is too thin, the boards are failing, or moisture damage has compromised the floor system. But when the floor is structurally sound and the wear layer allows correction, refinishing is often the more sensible path. You keep the existing floor, avoid demolition, and preserve the character of the wood already in the home.

If you’re hearing ā€œengineered floors can’t be sandedā€ without anyone examining the floor profile, that’s not a real assessment. It’s a shortcut.

A recent local-style example is the kind of oak engineered floor often found in a Head of the Harbor colonial renovation. The finish may be scratched and yellowed, but the boards themselves are still stable. In that case, the decision often comes down to whether the top layer can support full sanding or whether a less aggressive renewal is the safer move.

Our Advanced Dust-Free Hardwood Floor Refinishing Process

A common Head of the Harbor call goes like this: the floor looks worn, the house is furnished, and the homeowner wants the job done without coating every shelf, vent, and stair rail in sanding residue. That concern is valid. On engineered wood floors, the process has to protect both the home and the floor itself.

A five-step infographic illustrating Savera's professional, efficient, and clean dust-free hardwood floor refinishing process for homes.

What dust-free really means on the job

ā€œDust-freeā€ is industry shorthand, not a literal promise of zero airborne particles. Instead, it refers to controlled capture at the source. Professional sanding systems connect the machine to high-filtration vacuum equipment, so most dust is pulled in before it spreads through the room. That is a major improvement over older open-bag sanding setups, but containment still matters.

In practical terms, a clean refinishing job includes sealed work areas, protected returns and registers, careful airflow control, and HEPA vacuuming after each stage. Homes with open plans, second-floor overlooks, detailed millwork, or HVAC returns near the work zone need even tighter control. Homeowners who want general household strategies for reducing settled dust can also review J.G. Carpet Cleaning’s dust guide.

We also use specialized equipment designed for dust-free sanding machines because collection quality depends on the full setup, not just the sander itself.

How the process changes for engineered hardwood

Engineered floors are less forgiving than thick solid plank. The sanding plan has to match the wear layer, the board condition, and the amount of correction the floor can safely take. A floor with light finish wear may only need a mild abrasion and recoat. A floor with deeper scratches or uneven sheen may justify a more involved sanding sequence, but only if the top layer allows it.

That is why the first part of the job is inspection, not sanding.

A typical process looks like this:

  1. Prepare and isolate the space. Furniture is removed as needed, openings are contained, and nearby surfaces are protected.
  2. Clean the floor thoroughly. Residue, oils, cleaning product buildup, and any contaminant that could interfere with adhesion have to come off first.
  3. Choose the least aggressive correction that will solve the problem. On engineered wood, that decision protects the wear layer.
  4. Sand or abrade with dust collection running at the machine. Edges, corners, and field areas are handled as one controlled system.
  5. Inspect before finish goes down. During this step, scratch pattern, color consistency, edge work, and repair quality are checked under proper light.
  6. Complete final cleanup before coating. Fine dust left behind can affect both appearance and bond.

Here’s a look at the kind of process homeowners often want to see before booking a project:

Why this matters in a lived-in home

The biggest misconception is that dust control is only about cleanup. It also affects finish quality. If airborne dust settles back into wet coating, the floor can feel gritty or look less uniform than it should. Good containment helps protect indoor air, but it also helps produce a cleaner final surface.

For some engineered floors, full sanding is not the right move. Screen and Recoat can be the better option when the existing finish is worn but the surface damage has not gone through the coating into the wood. It refreshes protection with less material removal, which is often the smarter trade-off on modern engineered products.

Modern Finishes UV Cure vs Traditional Options

Once the floor is properly prepped, the finish choice controls two things homeowners care about right away. How soon the room can go back into service, and how the surface will hold up under real use.

A timeline graphic showing the evolution of hardwood floor finishes from oil-based to water-based to UV-curable technology.

What changes in daily use

On engineered wood, UV-cured finishes solve a practical scheduling problem. The coating hardens during the curing step, so homeowners are not waiting days for the floor to reach usable hardness. That can make a major difference in Head of the Harbor homes where families are trying to stay in place during the project, or where a sale, rental turnover, or move-in date leaves very little room for delay.

Traditional water-based finishes still have their place. They are proven, widely used, and often a good fit when the household can allow a longer recovery window. The trade-off is downtime. Even after the floor looks dry, it still needs time before rugs, furniture, and heavy use are a good idea.

That distinction matters even more on engineered flooring because the refinishing opportunity may be limited. If a floor only has enough wear layer for one full sanding, the finish system should match the homeowner’s priorities the first time.

Side-by-side practical comparison

Finish type Best fit Main trade-off
Traditional water-based finish Homeowners who can give the floor more time before full use Reliable option, but the cure window is longer
UV-curable finish Families, real estate listings, and busy households that need fast return to service Requires specialized equipment, careful prep, and a floor that is a good candidate for the system

Durability questions usually come next. The answer depends less on brand names alone and more on how the room is used, what condition the existing floor is in, and whether the prep was done correctly. A quiet guest room and a kitchen-adjacent family space put very different demands on the coating.

For engineered floors, bond matters as much as hardness. If the surface has contamination from waxes, polishes, or silicone-based cleaners, even a premium finish can fail. UV cure is not a shortcut around prep. It is a different curing method, and it performs best when the floor has been cleaned, abraded, and evaluated correctly. Homeowners who want more background on the coating itself can read this overview of UV finish technology for wood floors.

I usually explain it this way to clients. Traditional finishes dry and continue curing over time. UV finishes stay workable until the curing pass, then harden immediately under the light. That control is useful on engineered wood, where minimizing disruption without giving up finish quality is often the goal.

The right choice comes down to use, schedule, and floor construction. Pricing and finish options should be reviewed during an on-site consultation, after the floor has been checked for wear layer thickness, contamination, prior coatings, and the level of sanding the material can safely handle.

Frequently Asked Questions About Floor Refinishing

How do I maintain newly refinished engineered floors

Day-to-day care matters more than specialty products. Keep abrasive grit off the floor with entry mats, regular sweeping or vacuuming on a hard-floor setting, and quick cleanup of spills before moisture sits on the surface.

Use only cleaners that match the finish system on the floor. Wax, oil soaps, polish restorers, and silicone-based products create residue that can change the sheen and cause bonding problems later if the floor ever needs a recoat. On engineered wood, that matters because future correction options are often more limited than they are on solid hardwood.

If the floor starts to look tired, the cause is not always wear. In many homes, it is cleaner buildup.

Is dust-free refinishing safe for children and pets

It is safer and cleaner than open sanding, but homeowners should understand what the term means. A 99% dust-free system captures the vast majority of sanding dust at the source and keeps the job far cleaner than older methods. It does not mean a house becomes a sterile environment with zero airborne particles at every moment of the project.

Good containment, proper equipment, and careful cleanup make the difference. In homes with children, pets, asthma concerns, or general sensitivity to dust, I still recommend following job-site guidance, limiting access to work areas, and treating the project like any other controlled construction process.

Finish choice also affects indoor comfort. Low-odor, low-VOC systems are usually a better fit for occupied homes.

Can pets walk on a UV-cured floor right away

In many cases, yes. That is one of the practical advantages of UV-cured finish systems. Once the coating is properly cured under the UV light, the floor is ready for use much sooner than a traditional finish that still needs time to dry and harden.

The catch is prep. If the floor has contamination from wax, polish, or silicone residue, instant cure will not fix that. The finish still has to bond to a properly prepared surface, especially on engineered floors where the goal is to protect the wear layer while getting a durable result.

I also tell pet owners to use common sense the first day. Clean paws, trimmed nails, and delayed rug placement help protect a fresh finish.

What's the difference between a screen and recoat and a full refinish

A screen and recoat renews the top finish layer when the wood itself is still in good shape and the problems are limited to light surface wear, minor dullness, or small scratches. It does not remove deeper damage, change the floor color, or correct boards with finish failure.

A full refinish goes further. It removes the old finish and addresses heavier wear, deeper scratching, uneven color, and other issues that a recoat cannot solve. With engineered wood, the decision depends on the thickness of the actual wood wear layer and the current condition of the floor. Some engineered floors can be sanded and refinished successfully. Some should only be recoated. Some are too thin or too worn for either option.

That evaluation should happen on site, not by guesswork.

How long does a typical project take

The schedule depends on the floor construction, the square footage, the condition of the existing finish, whether repairs or stain work are needed, and which coating system is being used. A straightforward recoat moves differently than a full sand and refinish, and engineered floors often require a more cautious approach than solid hardwood.

The best way to get an accurate timeline and price is to have the floor evaluated in person. That allows the contractor to check the wear layer, identify contamination or prior coatings, and recommend the safest process for that specific floor.

Your Local Experts for Dust-Free Hardwood Floor Refinishing in Head of the Harbor

Homeowners on Long Island trust Savera Wood Floor Refinishing to restore the natural beauty of their hardwood floors. Our dust-free sanding system and advanced UV-curable finishes provide a modern alternative to traditional refinishing methods. With UV technology that cures instantly, you can move your furniture back the same day, no lingering odors, no downtime.

Whether you're looking for a Scandinavian whitewash, a natural raw wood look, a soft warm amber tone, or a custom stain to complement your home, we have the perfect refinishing solution for your style and home traffic.

All our services include dust-free containment and low-VOC, water-based finishes for a healthier, cleaner home environment. For homeowners seeking fast results, our UV-cured finish gets your floors ready the same day, so
you can enjoy your beautifully restored hardwood floors immediately.

Transform your hardwood floors with Savera Wood Floor Refinishing, clean, modern, and stunning every time! 🌟

šŸ“ž Phone: 631-866-1972
🌐 Website: saverawoodfloorrefinishing.com
šŸ“ Service Area: Head of the Harbor, Setauket, Stony Brook, and surrounding Long Island communities.


If you're planning Dust-Free Hardwood Floor Refinishing in Head of the Harbor with Savera Wood Floor Refinishing, call 631-866-1972 or visit the website to schedule an evaluation for engineered floors, dust-free sanding, UV-cure finishes, screen and recoat service, deep cleaning, or wax removal.
Screen and Recoat Hardwood Floors Cost in Head of the Harbor

When your hardwood floors lose their luster and start looking a little tired, figuring out the screen and recoat hardwood floors cost is your first step to bringing them back to life. For homeowners in Head of the Harbor, this professional service is easily the most wallet-friendly way to handle surface-level wear and tear. You can expect costs to start around $2.00 per square foot for a professional screen and recoat, a key part of any smart Head of the Harbor hardwood floor refinishing plan.

Think of it like a spa day for your floors. A screen and recoat isn't an aggressive, deep sanding process. Instead, it gently buffs away the old, worn-out topcoat, prepping the surface for a fresh, gleaming layer of new finish. This approach is perfect for restoring the elegant red oak floors commonly found in Head of the Harbor's beautiful homes.

Your Guide to Screen and Recoat Costs for Head of the Harbor Hardwood Floor Refinishing

In a place like Head of the Harbor, with its beautiful colonial and ranch-style homes, a screen and recoat is the ideal maintenance service to keep your floors looking pristine. It's specifically designed for floors that just need a refresh, not a complete gut-and-renovate job. This process is perfect for tackling light scratches, scuffs, and that general dullness that builds up over time, all without the cost and chaos of a full refinishing project.

A Smart and Affordable Maintenance Solution

The best way to look at a screen and recoat is as preventative maintenance. By investing in this service every few years, you’re actively protecting the wood from the kind of deep damage that would eventually demand a much more intensive—and expensive—fix. It’s a smart, proactive move that keeps your floors looking fantastic while seriously extending their lifespan.

For many Long Island families, this is one of the most practical maintenance options out there. If you take an average room of around 400 square feet, the project cost typically lands between $800 to $1,000. That makes it a really accessible way to refresh a living space without breaking the bank.

Cost Comparison: Screen and Recoat vs. Full Refinishing

To really see the savings, it helps to put the numbers side-by-side. Here’s a quick breakdown comparing the two services for a common project size of 500 square feet. You’ll immediately see why a screen and recoat is the go-to choice when the damage is only skin-deep for your Head of the Harbor hardwood floor refinishing needs.

Service Average Cost Per Sq. Ft. Estimated Total for 500 Sq. Ft. Best For
Screen & Recoat $2.00+ $1,000+ Light scratches, dullness, and minor wear.
Full Refinishing $4.00+ $2,000+ Deep gouges, stains, and color changes.

Ultimately, the right service boils down to the current condition of your floors. If you're not sure which direction to go, our experts in Head of the Harbor hardwood floor refinishing can give you a professional, honest assessment to help you make the best decision for your home.

What Really Shapes Your Final Project Cost in Head of the Harbor

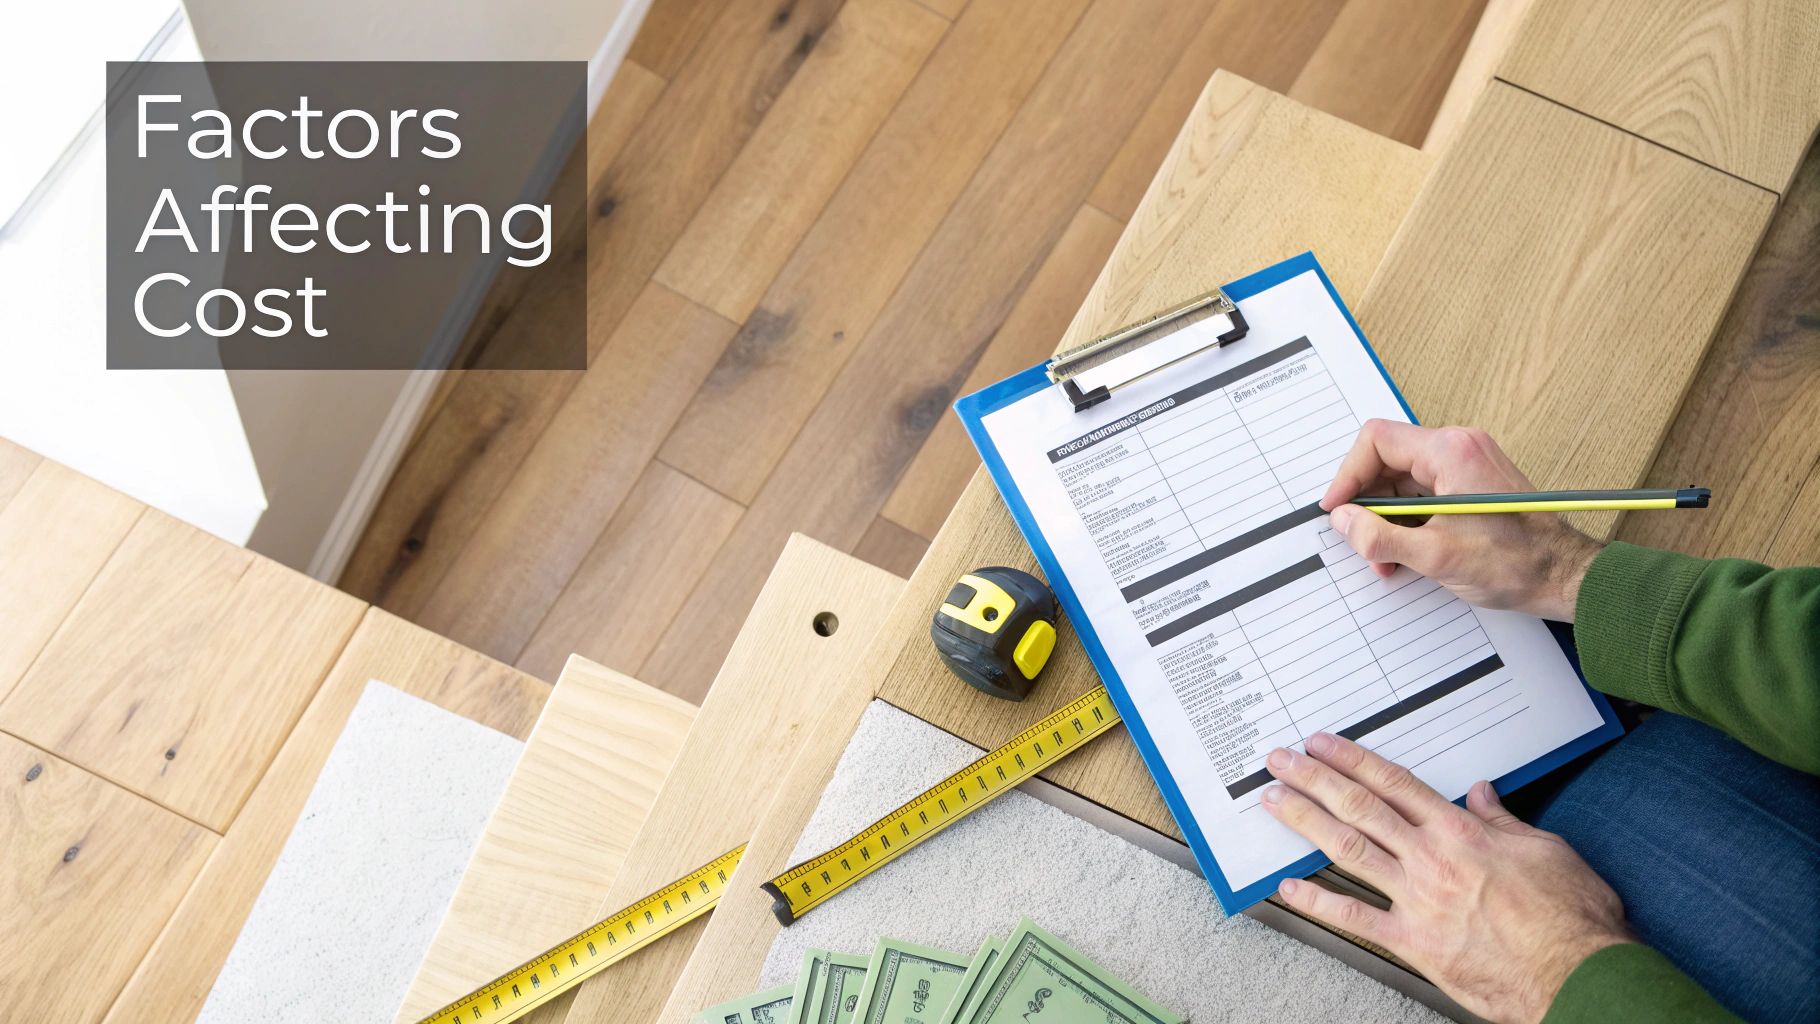
While a price per square foot gives you a good ballpark figure, several key variables ultimately determine the final screen and recoat hardwood floors cost for your Head of the Harbor home. Getting a handle on these factors helps you understand exactly what goes into your quote, so there are no surprises down the road.

Person's hands filling out a cost estimation form on wooden stairs with a tape measure and money.

More than anything else, the current state of your floors sets the stage. A floor with just some light surface wear is pretty straightforward, but other hidden issues can add necessary prep work to the job.

The Current State of Your Floors

If your floors have been reasonably well-maintained, they're likely a perfect candidate for a simple screen and recoat. The trouble starts when certain popular cleaning products have been used over the years, as they often leave behind a residue that prevents a new finish from sticking.

For example, wax-based polishes and oil soaps are notorious for this. A standard screening process simply can't cut through that buildup. If we tried to apply a new polyurethane coat over it, the finish would bubble, peel, and ultimately fail. In these situations, a special wax removal treatment is needed first, which starts at $2.50 per sq. ft. It’s an extra step, but it’s crucial for ensuring the new finish bonds properly for a strong, lasting result.

Project Size and Room Complexity

Of course, the total square footage of your project directly impacts the cost. Larger jobs, like doing the entire first level of a house, usually benefit from economies of scale, which can bring the price per square foot down a bit.

But it’s not just about size; the layout of the space is just as important. A big, open rectangular room is much faster to work on than a bunch of smaller, chopped-up areas.

  • Intricate Layouts: Think about all the extra edge work needed for hallways, closets, and rooms with lots of corners and alcoves. That all adds time.
  • Staircases: Stairs are a different beast entirely. They're a labor-intensive process requiring meticulous handwork and are priced separately from the main floor area.
  • Furniture Moving: Many homeowners prefer to clear out the rooms themselves, but we can definitely handle that for you. If we do, that service will be factored into the labor costs.

If you want to dig deeper into how these elements affect pricing, check out our other resources on wood floor refinishing price per square foot.

Your Choice of Protective Finish

The last major variable is the type of topcoat you choose. This is the protective shield between your beautiful wood and the wear and tear of daily life, so picking the right one is a big deal for your Head of the Harbor hardwood floor refinishing project.

At Savera, we work with a range of professional-grade finishes to fit your lifestyle and budget. Our go-to options are high-quality, durable water-based polyurethanes. They offer fantastic protection with the added benefits of low VOCs and quick drying times.

For clients who want the absolute best in durability and convenience, we also have our advanced Instant UV-Curable finish. This premium finish is cured on the spot with a specialized UV light machine. That means your floors are 100% cured and ready for furniture the second we walk out the door. It's the perfect solution for busy families who can't afford the typical downtime of traditional finishes.

The Savera Method for Flawless Head of the Harbor Hardwood Floor Refinishing

So, how does a professional screen and recoat actually work? Here at Savera, we've honed our technique to get stunning results for our Head of the Harbor clients, all while keeping the fuss and disruption in your home to a bare minimum. It’s a careful, deliberate method focused entirely on restoring that protective top layer and bringing back your floor’s original shine.

Every job starts with us coming out to take a look at your floors in person. This isn't just a quick glance; we're identifying the species of wood, inspecting the integrity of the current finish, and hunting for any red flags—things like old wax buildup or deep gouges that would stop a new coat from adhering properly.

Our Step-by-Step Renewal Process

Once we've confirmed your floors are a good fit for the process, we get to work on the prep. Our crew will carefully move your furniture out of the way before giving the floors a deep, professional-grade cleaning. This step is absolutely critical. We have to get rid of any surface gunk like dust, oils, or residue from store-bought cleaners that could get in the way of a perfect bond for the new finish.

Then comes the main event: the screening. Now, this isn't the aggressive, heavy-duty sanding you might be thinking of. We use a professional buffer fitted with a fine-grit abrasive screen. This lightly "scuffs up" the existing polyurethane layer, creating the ideal microscopic texture for the new topcoat to grab onto for a lasting bond. It’s a virtually dust-free step that preps the surface without taking off any of the actual wood.

Applying the Finish and Ensuring Durability

After a final, meticulous vacuuming to pick up any fine particles left behind, we lay down a fresh coat of a premium, high-traffic finish. You can stick with our durable, eco-friendly water-based options or go for our game-changing UV-Cure finish. This incredible technology is hardened on the spot with a special UV light, which means your floors are 100% cured and ready for foot traffic the moment we pack up our tools. You can literally move your furniture back into your Head of the Harbor home that very same day.

The sheer efficiency of this service is a huge part of what keeps the screen and recoat hardwood floors cost so reasonable. A screen and recoat usually takes just a few hours from start to finish, a world away from the multi-day affair of a full refinishing job. For a 1,000-square-foot space, that can translate to labor costs of $400 to $800 instead of several thousand. For more insights, check out this guide on the cost benefits on FloorFathers.net.

This streamlined approach doesn't just save you a significant amount of money; it drastically cuts down on the downtime and inconvenience. You can dive deeper into the technical details by reading our guide to the Savera screen and recoat process. We’ve truly perfected this method to give you a flawless, tough-as-nails result without having to put your life on hold.

Making The Right Choice For Your Hardwood Floors in Head of the Harbor

Choosing between a screen and recoat and a full refinish is probably the most critical decision you'll make for your hardwood floors. Get it right, and you save a ton of time and money. Get it wrong, and you're in for some real frustration. It’s a key part of the Head of the Harbor hardwood floor refinishing process.

The whole trick is to look closely at your floors, figure out what kind of wear and tear you're dealing with, and then match it to the right service.

A screen and recoat is the perfect, wallet-friendly fix for floors that are looking a bit tired but aren't seriously damaged. Imagine the beautiful oak floors in a classic Head of the Harbor colonial that have just lost their luster over the years—that's the ideal scenario. If you're seeing mostly light surface scratches, a dull finish, or just general wear in the spots you walk most, this process will bring them back beautifully.

When Full Refinishing Is The Only Way

But let's be clear: a screen and recoat is a maintenance job, not a magic wand for deep damage. It only works on the very top layer of the finish. It doesn't touch the wood underneath.

You absolutely need to go for a full, dust-free sanding and refinishing if your floors are showing any of these signs:

  • Deep Gouges: We're talking about those nasty scratches from dragging a heavy sofa or dropping something sharp that went right through the finish and into the wood.
  • Significant Stains: Deep-set pet stains or water damage that have seeped into the wood grain and left dark, discolored marks are a no-go for recoating.
  • Widespread Bare Patches: If you have areas, especially in hallways or doorways, where the finish is completely gone and the wood is exposed and turning gray, you need to sand.
  • A Desire for a Color Change: Want to go from a light oak to a deep walnut? The only way to do that is to sand off every last bit of the old finish and color.

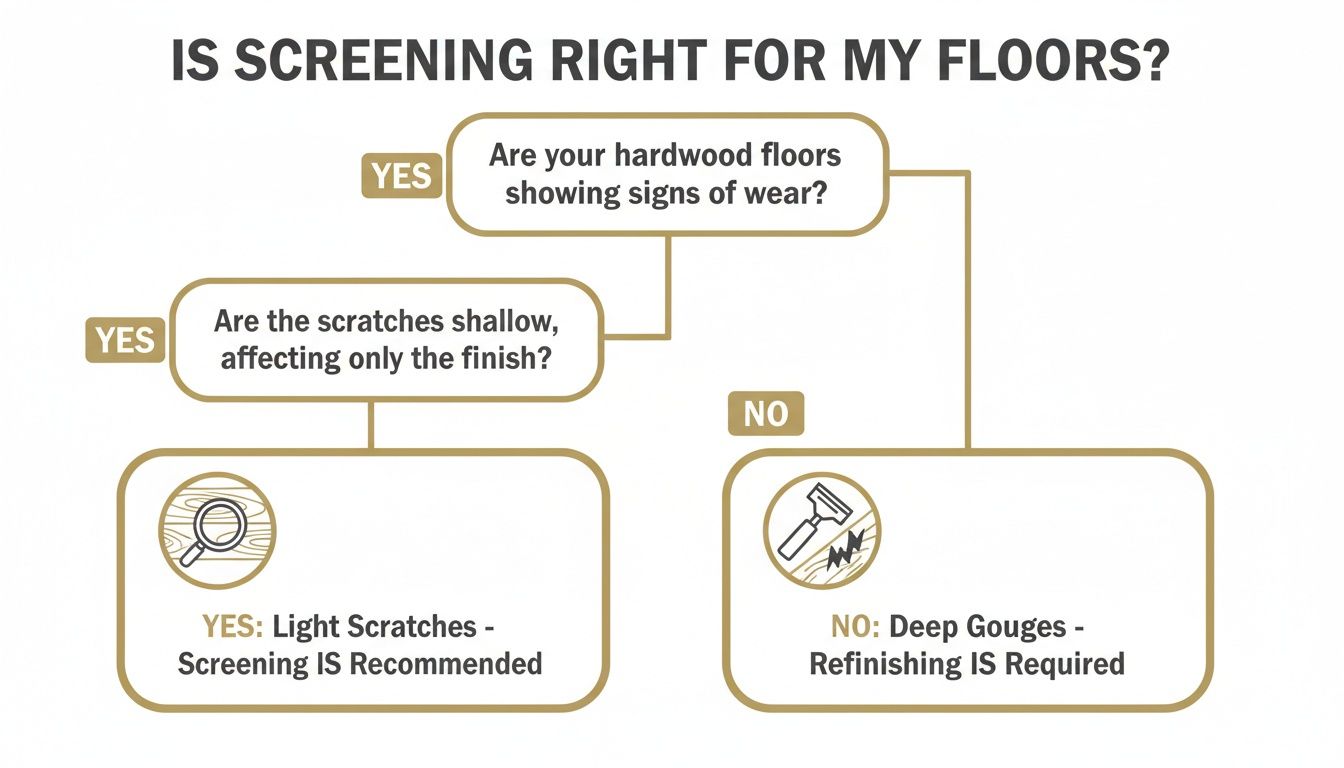
This handy decision tree can help you visualize whether your floors are a good candidate for a simple screen and recoat.

Decision tree showing when to screen or refinish hardwood floors for wear.

As you can see, light surface stuff is perfect for screening. Anything that goes deep requires the more powerful approach of a full refinish.

To make things even simpler, here's a quick guide to help you decide.

Service Decision Guide: Screen and Recoat vs. Full Refinishing

Floor Issue Recommended Service Reasoning
Dull, lackluster finish with no bare wood Screen and Recoat The finish is intact, just worn. Lightly abrading and adding a new topcoat is all that's needed.
Minor surface scratches (fingernail doesn't catch) Screen and Recoat These are just in the topcoat. A recoat will fill them in and restore the uniform sheen.
Deep scratches or gouges into the wood Full Refinishing The damage is in the wood itself. The floor must be sanded down to remove the imperfection.
Water stains or dark pet stains Full Refinishing Stains that have penetrated the wood grain cannot be removed without sanding the wood.
Color change desired Full Refinishing The old stain must be completely sanded off before a new color can be applied evenly.
Graying or exposed raw wood patches Full Refinishing The protective finish is gone, and the wood is oxidizing. It needs to be sanded to fresh wood and sealed.

Choosing the right service based on your floor's actual condition is the key to getting a great result without overspending.

Making An Informed Decision

Knowing the difference means you won't get talked into a service that can't fix your problem, nor will you overpay for a heavy-duty solution you just don't need. The screen and recoat hardwood floors cost is always going to be much lower simply because it’s a less labor-intensive process that works with what you already have.

If you want to get into the nitty-gritty of each process, our guide comparing hardwood floor refinishing vs. resurfacing is a great next step. Picking the right path is about more than just making your floors look good today—it’s about protecting your investment for years to come.

Why a Screen and Recoat is a Smart Investment, Not Just an Expense

It's easy to see floor maintenance as just another bill to pay. But for homeowners who think long-term, shifting that perspective is key. Viewing the screen and recoat hardwood floors cost as a strategic investment in your home’s future is the smarter way to look at it.

Think of it like changing the oil in your car. A little proactive maintenance now prevents a massive, expensive engine overhaul later. Committing to a screen and recoat every 3-5 years is that essential tune-up for your floors, preserving their beauty and structural health for the long haul.

This simple act of regular upkeep can push back a full-blown, disruptive refinishing project by a decade or even more. When you do the math over the life of your floors, that smart scheduling can literally save you thousands of dollars.

Protecting Your Property Value in Head of the Harbor

In a competitive real estate market like Head of the Harbor, first impressions are everything. What’s one of the first things potential buyers notice? The floors.

Gleaming, well-cared-for hardwood floors can be a massive selling point. On the flip side, floors that look dull, scuffed, and tired can drag down your home's entire appeal and even hurt its market value. A timely screen and recoat keeps your floors looking like the stunning centerpiece they should be.

The data backs this up. Industry analysis shows that homeowners who stick to a regular screen and recoat schedule can often double the lifespan of their floor's finish. That means extending the time between major refinishing projects from an average of five years to ten or more. You can read more about the long-term benefits of floor maintenance on HomeAdvisor.

A Bigger Picture Approach to Home Care

Smart homeownership is about looking at the entire property, not just one piece at a time. The health of your floors is connected to the overall upkeep that preserves and enhances your home's value.

When you're planning your maintenance calendar, it's helpful to explore a full range of additional home maintenance options to get a complete picture.

Ultimately, putting a screen and recoat on your to-do list is a strategic financial move. It protects the wood, makes your home look fantastic, and secures your property value, making it one of the best maintenance decisions a Head of the Harbor homeowner can make.

Got Questions About Screening and Recoating? You're Not Alone.

Even when you have a good handle on the basics, it's natural to have a few more questions pop up before you commit. We get it. Here are some of the most common things homeowners in Head of the Harbor ask about the screen and recoat process and costs. We’ve laid out clear, simple answers to help you feel totally confident about your decision.

A tablet, a cup of coffee, and a book titled 'SCREEN & RECOAT FAQ' on a wooden desk.

How Long Does This Whole Process Take?

Speed is one of the biggest wins here. For an average-sized room or space, we can typically complete the entire screen and recoat job in just a few hours—not days.

That quick turnaround gets even faster when you opt for our state-of-the-art UV-cure finishes. Traditional finishes need hours, sometimes days, to dry and cure properly. Our UV technology hardens the new finish instantly. That means you can get your furniture back in place and walk on your floors the very same day, keeping the disruption to your life at an absolute minimum.

Can a Screen and Recoat Get Rid of Deep Scratches or Pet Stains?

This is a really important question because it's all about setting the right expectations. A screen and recoat is strictly for surface-level wear and tear. It works wonders on minor scuffs, light scratches, and that general dull look that floors get over time.

However, it’s not a fix for damage that has gone through the finish and into the wood itself. Things like deep gouges, dark pet stains, or water damage have compromised the wood fibers. To fix that kind of damage, you'd need our full dust-free sanding service to remove that top layer of wood and start fresh.

Is This Going to Make a Huge Mess?

Not at all. We know keeping your home in Head of the Harbor clean is a huge deal. The "screening" part of the job is just a light buffing—it's nothing like the aggressive sanding you see with a full refinish.

This gentle process creates almost no airborne dust. We use professional-grade equipment designed to be clean and efficient, making this a virtually dust-free service that keeps your home's air quality pristine.

Our commitment to a tidy job means you won't be left cleaning up a fine layer of dust for weeks. It’s a clean, simple, and incredibly effective way to refresh your floors.

How Often Should I Get My Floors Screened and Recoated?

The best way to think about a screen and recoat is as routine preventative maintenance for your hardwood. For most homes, we recommend doing it every 3 to 5 years.

Of course, the perfect timing really comes down to your lifestyle.

  • High-Traffic Homes: If you have kids, pets, and lots of visitors, you’ll probably want to stick closer to the 3-year mark to keep things looking sharp.
  • Low-Traffic Homes: In quieter homes without as much activity, you can easily go 5 years or even a bit longer between services.

Staying on a regular schedule is the smartest way to protect your floors for the long haul. This proactive approach helps you push off a far more expensive and involved full refinishing project for many, many years. For more in-depth answers, check out our hardwood floor refinishing FAQ.


Homeowners on Long Island trust Savera Wood Floor Refinishing to restore the natural beauty of their hardwood floors with our dust-free sanding system and advanced UV-curable finishes. Unlike traditional methods, our UV technology cures instantly, so you can move furniture back the same day with no lingering odor or downtime. Choose the perfect refinishing service to match your needs and home traffic. Our dust-free process ensures a clean, beautiful finish every time.

šŸ“ž Phone: 631-866-1972
🌐 Website: saverawoodfloorrefinishing.com
šŸ“ Service Area: Head of the Harbor, Saint James, Stony Brook, Setauket, and surrounding Long Island communities.

Dust Free Sanding in Head of the Harbor, NY: The Smarter, Cleaner Way to Refinish Hardwood Floors with Savera

For homeowners in Head of the Harbor, preserving the unique character of your home—from a historic colonial to a modern North Shore estate—is always top of mind. But when it comes to refinishing hardwood floors, one big worry often gets in the way: the fine, pervasive dust that seems to settle on absolutely everything. Keeping historic and high-end homes clean during renovations is a challenge, but at Savera Wood Floor Refinishing, we offer a modern solution that solves it. Our dust-free sanding system is the cleaner, smarter way to restore your floors and deliver a stunning finish without the mess, making it ideal for the luxury and family homes in the North Shore area. If you're considering hardwood floor refinishing in Head of the Harbor, NY, our advanced approach is the answer.

A modern living room in Head of the Harbor with beautifully refinished hardwood floors, demonstrating a clean, dust-free environment.

This outdated process is especially disruptive in homes where fine art, sensitive electronics, and custom furniture are at risk. Beyond the mess, all that airborne dust can be a real health concern, particularly for family members with allergies or asthma. Savera's modern system changes everything.

What Is Dust Free Sanding?

So, what’s the secret behind a hardwood floor refinishing project that leaves your home spotless? The technology behind dust free sanding in Head of the Harbor, NY, is actually pretty simple but incredibly effective. It’s not about magic—it’s about capturing the dust right at the source with HEPA vacuum-integrated sanding technology.

At the core of Savera’s process is advanced sanding equipment that’s hooked up to a powerful, sealed vacuum system. Traditional sanders just fling fine wood dust everywhere. Our machines, on the other hand, are directly connected to high-efficiency particulate air (HEPA) vacuums.

As the sander glides across your floor, stripping away the old finish and smoothing the wood, the vacuum creates a strong suction field right at the sanding head. It instantly captures up to 99% of the dust particles the second they’re created, preventing them from ever getting into the air and circulating through your home.

The Critical Difference Between Methods

Think about traditional sanding like sweeping a dusty room with a dry broom. No matter how you do it, you’re going to kick up a cloud of fine particles that eventually settles on everything.

Our dustless system is the complete opposite. It’s more like using an industrial-strength, sealed vacuum that leaves the air and surfaces perfectly clean. This is the key difference between old-fashioned methods and Savera’s dust-free refinishing.

This is about more than just avoiding a massive cleanup job. Capturing dust immediately gives you a much better final product. When you don’t have airborne particles landing on the wet stain or polyurethane, you get a flawlessly smooth finish that truly brings out the wood's natural beauty. It's a huge reason we can deliver such beautiful, consistent results for hardwood floor refinishing in Head of the Harbor.

The global floor sanding market is set to hit $2.1 billion by 2032. This explosive growth is almost entirely thanks to dustless methods, as more and more homeowners are demanding cleaner, safer, and healthier options for their renovations. Discover more market insights on the growth of dust-free technology.

Our dedication to this cleaner, more efficient technology is exactly why we can offer services like our same-day dust-free refinishing in Lake Ronkonkoma. This system isn't just a promise to be tidy; it’s a proven method that protects your health, your home, and the final quality of your floors.

Benefits for Head of the Harbor Homeowners

When you choose our dustless hardwood floor refinishing, you're getting so much more than just a clean house. For homeowners in Head of the Harbor, the advantages touch on everything from your family’s health to the final, beautiful look of your floors. This is how modern hardwood floor sanding in Head of the Harbor gets rid of all the old headaches.

  • Keeps your home spotless: No need for heavy post-project cleaning of furniture, drapes, or air ducts.
  • Healthier air quality: Essential for families with children, pets, or allergy-sensitive residents.
  • Faster completion time: Eliminating the cleanup phase means your project is done quicker.
  • Cleaner, superior results: A dust-free environment ensures a flawless, smooth finish.

This graphic really breaks down the difference our system makes for hardwood floor refinishing in Head of the Harbor.

Infographic about dust free sanding

As you can see, capturing nearly all the dust means less time cleaning and fewer particles floating around in the air you breathe. It just creates a much healthier home.

A Healthier Environment For Everyone

The biggest win here is easily the massive improvement in your home's indoor air quality. By capturing up to 99% of dust right at the source, we stop those tiny wood particles from ever going airborne.

This is a game-changer, especially for:

  • Family members dealing with allergies or asthma
  • Homes with young children or elderly relatives
  • Anyone with pets, since they're sensitive to dust, too

Cutting down on airborne dust makes your home a safer space for everyone. It’s a goal that can be further supported by using other products designed for sensitive environments, like hypoallergenic cleaning products.

To truly grasp the difference, let’s look at the old way versus the new way side-by-side.

Traditional Sanding vs Dust Free Sanding A Clear Comparison

This table really highlights the advantages for Head of the Harbor homeowners, showing why our modern approach is a smarter investment in your home's quality and your family's well-being.

Feature Traditional Sanding Savera’s Dust Free Sanding
Dust Containment Minimal. Creates heavy airborne dust that spreads throughout the home. Captures up to 99% of dust at the source using powerful HEPA vacuums.
Air Quality Poor. Fills the air with fine wood particles, aggravating allergies and asthma. Excellent. Keeps indoor air clean and safe for children, pets, and sensitive individuals.
Cleanup Extensive and time-consuming. Requires deep cleaning of the entire house. Minimal. No lingering dust on surfaces, furniture, or in air ducts.
Finish Quality Prone to imperfections. Airborne dust settles on wet finish, causing bumps. Flawless and smooth. A clean environment ensures a perfect application every time.
Convenience Highly disruptive. Often requires homeowners to vacate the property for days. Far less intrusive. You can stay in your home comfortably during the process.

The choice is clear. Our dust-free method isn't just about cleanliness—it's about delivering a superior result with far less disruption to your life.

A Flawless, Superior Finish

You simply can't get a perfect finish in a dusty environment. It's impossible. When dust particles are floating around, they inevitably land on the wet stain or sealer, leaving you with little bumps and a gritty texture that ruins the final look.

With dust-free sanding, each coat is applied in a pristine environment. This results in a perfectly smooth, clear, and durable surface that truly lets the wood's natural grain and beauty shine.

This isn't just about looks; it's about durability, too. A clean application makes for a stronger, more resilient finish that stands the test of time. It's no wonder the global market for dust-free sanding abrasives is projected to hit $368 million by the end of the decade. The entire industry is moving this way for a reason.

This level of quality is even more impactful when you pair it with the latest finishing technologies. To see how a clean start leads to a faster, tougher result, you can learn more about our instant UV-curable finishes that let you get back on your floors the very same day.

Savera’s Professional Process: From Preparation to Perfection

At Savera Wood Floor Refinishing, we find that the best projects start with clear communication. When homeowners are looking into hardwood floor sanding in Head of the Harbor, knowing exactly how we work brings a lot of peace of mind. We’ve refined our process to be as efficient and non-disruptive as possible, so you get stunning floors without the stress.

Step 1: Meticulous Preparation

Before a single sander touches your floor, our top priority is protecting your home. We meticulously tape off baseboards and seal off adjacent rooms, light fixtures, and any built-in cabinets. Think of it as creating a self-contained workspace to keep the rest of your home completely untouched. We also do a final walk-through of the floor itself, hunting for any loose boards or nails that need securing.

Step 2: The Dust-Free Sanding Stages

This is where the magic really happens. We fire up our powerful sanding machines, each one directly hooked up to a high-powered HEPA vacuum system. This isn't just a shop vac on the side—it's an integrated system that captures over 99% of the dust the second it comes off the floor. We use a careful progression of different sanding grits to methodically work the wood down to a perfectly smooth surface, erasing old finish, scratches, and dings. This multi-stage process is what separates a truly professional job from a DIY attempt and guarantees a flawless, uniform surface.

Step 3: Sealing with Eco-Friendly Finishes

Once the wood is raw and perfectly prepped, it's time to bring your vision to life. We apply your chosen stain with an expert touch, making sure the color is rich, deep, and totally consistent. We use premium, eco-friendly, low-VOC products, which means fewer odors and a healthier home.

After the stain has set, we apply several coats of a top-tier, durable finish to protect your investment. Need your room back in a hurry? We also offer our advanced UV-cure technology. This optional finish is hardened instantly with a special UV light, meaning you can put your furniture back and walk on your beautiful new floors that very same day. We have completed many before-and-after transformations in Suffolk County homes, delivering stunning results with minimal downtime.

If your floors just have minor surface wear, you might be interested in a different approach. Our Screen & Recoat Service is a great way to refresh your floors' protective layer.

Why Choose Savera for Hardwood Floor Refinishing in Head of the Harbor?

When it comes to hardwood floor sanding in Head of the Harbor, the team behind the tools is just as important as the technology they use. At Savera Wood Floor Refinishing, we're not a big, faceless corporation; we're your local experts. We live and work right here, serving Head of the Harbor and surrounding towns like St. James and Smithtown with decades of craftsmanship and precision.

A professional from Savera Wood Floor Refinishing carefully applying finish to a newly sanded hardwood floor.

We've worked in just about every kind of home Suffolk County has to offer, from classic colonials to modern waterfront properties. That local knowledge allows us to deliver results that don't just look good but truly fit the character of your home. We are trusted by homeowners restoring their original hardwood floors because we combine our deep local expertise with the best equipment in the business.

A Commitment to Craftsmanship and Quality

Our dedication to professional floor sanding drives us to invest in systems that deliver a superior result, like our high-powered dust-free sanding vacuums and our instant UV-curing technology. It's this one-two punch that ensures a flawless surface while keeping your home clean and your family safe from airborne dust.

You see, the entire industry is moving toward cleaner, healthier methods. The market for specialized dust-free abrasive paper was recently valued at $1.2 billion and is expected to hit $1.8 billion by 2033. Why? Because more and more pros are realizing the benefits of materials designed to trap dust right at the source. It’s a huge step forward for reducing respiratory risks and slashing cleanup time—a standard we bring to every single job.

Your Trusted Partner in Home Improvement

Homeowners across the North Shore rely on us to bring back the timeless beauty of their hardwood floors, and they do so because we offer a level of care only a local business can. We know that a great project begins with clear communication and a solid plan. As you consider working with our local hardwood floor refinishing experts, it’s always smart to understand the bigger picture of how to estimate renovation costs accurately so you can feel confident from start to finish.

Our goal is simple: make the refinishing process as smooth, clean, and rewarding as possible. We treat your home like it's our own, delivering a pristine, durable finish that you'll love for years to come.

FAQ: Dust-Free Sanding in Head of the Harbor

A homeowner looking satisfied at their newly refinished hardwood floor, free of any dust or mess.

Choosing to refinish your floors is a big step, and we get it. To help homeowners in Head of the Harbor feel great about their decision, we've put together answers to the questions we hear most often about our dust-free sanding services.

Is The Process Truly 100% Dustless?

Let's be upfront: achieving a 100% perfect, laboratory-grade dustless environment isn't realistic. But our system gets you as close as humanly possible. Our high-powered HEPA vacuums are attached directly to the sanding equipment, sucking up over 99% of airborne particles the very instant they're created. This means no fine layer of wood dust settling on your bookshelves, curtains, or countertops. It's a world of difference from the dust storms of old.

How Long Will My Refinishing Project Take?

The exact timeline always depends on the size and complexity of the job. But here’s the great news: dust-free sanding in Head of the Harbor, NY, is significantly faster than old-school methods simply because we cut out all the tedious cleanup time. For an average room, we can typically have the floors sanded and finished in just one to three days. If you go with our cutting-edge UV-curable finish, those floors are fully cured and ready for you to move furniture back in on the very same day.

Is Dust-Free Sanding More Expensive?

The initial quote for dustless hardwood floor refinishing might be slightly higher because the equipment is highly specialized. However, homeowners in Head of the Harbor quickly realize it's the more valuable choice in the long run. When you factor in the money you save by not needing a professional deep clean for your entire house—plus the peace of mind from protecting your family from airborne dust—the smarter investment becomes obvious.

Can You Refinish Engineered Hardwood Floors?

Yes, in most cases, we absolutely can! Our dust-free system works beautifully on all sorts of flooring, from solid oak to engineered hardwood. The only real requirement is that the top layer of wood veneer is thick enough to be safely sanded. During your in-home consultation, one of our flooring experts will take a close look at your floors to make sure they're a good candidate for our dustless process. For even more answers, feel free to check out our complete hardwood flooring FAQs.

Protect your home and breathe easier with Savera Wood Floor Refinishing’s Dust-Free Sanding in Head of the Harbor, NY. Schedule your consultation today at saverawoodfloorrefinishing.com and discover how clean and simple refinishing can be. Homeowners on Long Island trust Savera Wood Floor Refinishing to restore the natural beauty of their hardwood floors with our dust-free sanding system and advanced UV-curable finishes. Unlike traditional methods, our UV technology cures instantly, so you can move furniture back the same day with no lingering odor or downtime. Choose the perfect refinishing service to match your needs and home traffic. Our dust-free process ensures a clean, beautiful finish every time.

šŸ“ž Phone: 631-866-1972
🌐 Website: saverawoodfloorrefinishing.com
šŸ“ Service Area: Head of the Harbor, St. James, Smithtown, Stony Brook, and surrounding Suffolk County towns.